Monday, November 5, 2012


A couple of weeks ago, I made up this pattern for, what I'm calling, a lunch bucket!  My daughter says it should be called a Girlie Lunch Bucket as no boy would ever carry it!  Whatever!  I like it and it's nice and roomy for hauling my leftovers to school for lunch.  It seems to be highly complimented by the teachers in my school so I thought I'd share the tutorial in case you're looking for teacher-gift ideas for the holidays.  Also, I made the whole thing for around $5 which is my kind of price with the holidays looming...
Finished Lunch Bucket


You will need:
2 pieces of outside fabric cut 10"X12"
2 pieces of lining fabric cut 10"X12"
2 pieces of thermal lining such as Insul-Fleece cut 10"X12"
1 piece of outside fabric for the handles cut 5"X 20"
1 piece of top fabric (yellow floral in the tutorial) cut 10" X 24"

Supplies needed.


First, make your handles.  Iron the long strip of fabric in half and then turn under each long raw edge about 1/2" and iron.  Iron the whole thing flat.  Top stitch down the outside edge and cut into two equal 10" pieces. 


Two equal handles


Next attach the outside fabric to the thermal lining.  I serged mine together on the serger but you could just as easily sew it together with a narrow seam along the edges.  It will all be turned inside of the lining so the raw seams will be hidden.


Next attach the handles to the l2" side of the outside fabric.  I sewed each end of the handles 3 inches in from the edge of the fabric.  
Attached handles

Next you are going to make the top of the bag where the drawstring will go.  Turn in a 1 inch section of the fabric on the short sides and press.

Now fold the entire piece in half lengthwise and press.

Then slip one end slightly into the other end with no more than 1 inch of overlap in the fabric and pin.  Sew this seam together leaving the inch closest to the fold unsewn.  Make sure to backstitch your stops and starts on this seam.

  Now sew a seam all the way around this piece about 1" down from the fold.  You are making the channel for your drawstring.

Next you will sew the outside of the bag together.  Place the two outside pieces with the handles right sides together and sew a 1/4" seam around the sides and bottom of the bag.
 Next, you will box the corners of the bag so it can sit up by itself.  

Pull the bottom corner of the bag into a triangle shape like the above photo.  Match up the side seam with the bottom seam.  Mark a straight line across the triangle 2 1/2 inches from the point.  Sew across this line then cut off the triangle part leaving about a 1/2 inch of excess before the seam.  Do both bottom corners.
The bottom of the bag after the corners have been boxed and trimmed.
Next you will attach the top fabric to the body of the bag.  Push it into the bag, line up the raw edge with the top edge of the bag and sew them together.


Turn the bag right side out.

Now sew the lining pieces together leaving the top open.  Box the corners for the lining using the same method as above.


Fold the top of the bag down against the body of the bag like the photo below.


Place the bag inside of the lining, lining up the side seams.  The lining will be inside out and the bag will be right side out.

Sew around the top of the bag/lining leaving about a three inch space unsewn so you can turn it right side out.


Turn the bag right side out.  Pin the lining to the bag turning under a 1/2 seam where you left the opening. Pull the lining into the bag, press flat and topstitch around the whole top just below the handles.


Thread a piece of ribbon or cording into your drawstring channel and tie both ends of the string together in a knot.

Voila!  A finished lunch bucket!
Happy making!

Thursday, August 30, 2012

Well blogging has surely suffered this summer!  We have had an excellent summer with lots of traveling and my son's summer baseball games.  We've been in 9 states this summer!  Plus, the state of bliss that happened while lying on the beach for a few weeks. We've been to two weddings, a concert, a musical, a baby shower, a week-long Fine Arts competition in Louisville, Kentucky, and the most amazing museum I've ever encountered, The City Museum, in St. Louis, MO.
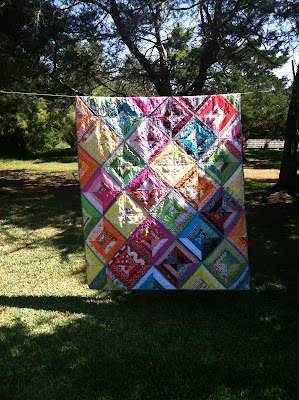
  The quilt below was finished around the second week of July.  It is my absolute favorite.  It hasn't even crossed my mind to give it away.  It will forever be a family quilt.  I just made it twin sized but now I'm wishing that I'd made it king sized to fit my bed.  It is currently across the bottom of my bed but has also done a stint in the car (while traveling) and on the couch!  If I ever catch up on my other sewing projects, I'm going to make another one and it will be huge! I've affectionately named her, "Strings on the Line" as her photo shoot was on my Dad's clothesline!


 This quilt was made for my cousin and his wife who are expecting a little girl in October!  Her name is to be Layla Grace so I foundation pieced her name and added it to her quilt.  It's just random half-square triangles in the colors of her nursery.  I love things with names on them!  Maybe it is because I could never find my name (Randi) on anything as a child!  I may make name quilts for all the baby showers this year.  Maybe I'll start a trend....


Monday, May 28, 2012

Two finished quilts and one WIP!

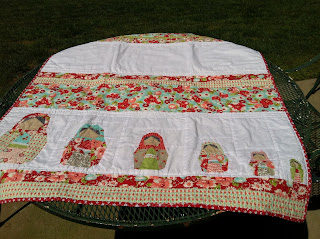
Matroyshka 2 finished for my good friend's baby's 1st birthday!  I really love how this one turned out!  The color are fantastic!  It almost has a matryoshka surfer girl vibe!
The colors almost look different in every photo I took.  I think these colors are more true than the top photo.  The aqua fabrics are from the Moda Grunge line which I have not used before but will definitely use again!  And the berry color is from the new Michael Miller Broadcloth Couture line which is amazing.  It feels so soft and silky.  When I hear broadcloth, I usually think not 100% cotton but this is 100% cotton and fabulous.  Can you tell I'm a newly converted fan?


I'm calling this quilt Triangle Fancy.  When the Flea Market Fancy fabric reprint was released, I bought almost the whole collection in either 1/2 yard or 1 yard cuts.  Then I stared at it for a while and petted it and tried to let it tell me what it wanted to become...Truthfully, I'm not sure that this is what it had in mind but I needed to make a quilt for a silent auction fundraiser for our son's fine arts group at church and I had all of this on hand and I was rather inspired by this quilt by Anna Marie Horner so this is what I came up with!  I've sewn really biasy things before but I've never done triangles like this.  They aren't difficult but you have to be awfully careful about pulling and stretching!  
The back of Triangle Fancy is so fun!  I quilted with straight-ish lines a 1/4 inch from all of the seams and it made this lovely grid of triangles on the back.  This photo was taken pre-washing but post-washing, it looks even better in all of it's crinkly goodness!  I love what a good wash does for my crooked seams!


This string quilt top has been sorta hangin' out in my sewing room for a while.  I get between projects and add a few more blocks.  This weekend it grew by 24 blocks!  This photo only shows 12 of the new blocks but the photos can't even keep up with me!  I've not measured it yet but each block finishes at 8" square and so far it's 6 blocks by 9 blocks so I'm guessing it's about 48" by 72".  I think I'll add another 16" to the width to make it 64" and one more to the length to make it 80" and call it quits.  It has been hanging here long enough!  But it has made a significant dent in my strip scraps.  I actually had to cut into some orange and purple fabric last night as I was fresh out of those scraps!  Still have plenty of blue, pink, and yellow though! 

Sunday, May 13, 2012

Holy Goodness, May is Half Over!

The spring is just flying by!  I've been too busy to post but here's a little current sewing mania!
Here is the current progress on the Farmer's Wife Sampler Quilt.  I'm trying to stay on track with two blocks a week but I'll admit, I'm slightly behind!  My goal is to finish this one before school starts back in August.  If you aren't farming and you feel compelled to, do it.  I don't really even like sampler quilts but this has been an amazing skill builder for me.  I'm a MUCH better quilter for having done this.  This is the 64 block mark!  I have 47 to go!


Also, on the table is a quilt top waiting for me to make the back and quilt it for a charity auction. It's made entirely of the reprinted Flea Market Fancy fabric cut into triangles!  I must say, I've struggled a little with the bias-y triangles but in the end, it's going to be fine.


I've also spent some time playing with random placement of half-square triangles on the placemats below.  I made the triangles and just started putting them together with little to no thought.  I really love how these placemats came together.  They are a wedding present!


And even though this picture is crooked and dark and hideous, these new matryoshka dolls are adorable!  This quilt is being made for a very special little girl!  Hopefully, it will be done this week!  I'll post finished pics.


AND....the big news is that my Little Red and Her Big Bad Quilt sold in my etsy shop!!!!  Now I can never say again that I've never sold anything!  I'm so blessed on this Mother's Day.  My family is a huge blessing in my life.  My mom is incredible!  My mother-in-law is wonderful!  And my step-mother is amazing!  AND...I have the two most wonderful children ever.  These people keep me going and I thank God for all of them.
Thursday, April 12, 2012

Little Red and Her Big Bad!

This is my new favorite!  Well, at least this week's favorite.  Introducing, Little Red and her Big, Bad!  This quilt was made with charm squares from the "Walk In The Woods" fabric line by Aneela Hoey for Moda Fabrics.  I paper pieced the characters and then built the quilt around them.  This is monumental for me because it's one of the two quilts that I listed for sale on etsy.com today!  I've never sold anything!  But today, I listed this and the matryoshka doll quilt!  You can find the listings here!


Here are some photos of the matryoshka dolls again too!


Tuesday, March 13, 2012

Sisters, Daughters, and Cousins

Last weekend's sewing projects were so girly!  First up was a dress for my daughter to wear in a wedding on March 23rd.  I know it seems a little last minute but I was afraid to do it too soon because of the rate at which she is currently growing:)   The bride's only specification was that she was to wear white, so this is what I came up with.  We loosely interpretted a pattern whose number I can't remember.  Then I did a lot of fitting and adjusting and ended up with this.  

This child has captured my heart in so many innumerable ways.  She brings me so much joy.  She is growing into such a marvelous human being.

Of course, then we had to shop for slip and shoes and under things!  It was pretty fun but my quilting bug was itching me something awful whilst I made the dress.  So we ended up the weekend (Sunday night) finishing these.

I think of them as cousins.  Girl cousins.  Playing dress-up.  
The matryoshka pattern is from bubble stitches available on etsy!
Monday night, I assembled their quilt top.  Apologies for the wrinkley photo!  As soon as she's quilted and the sun shines, I'll get a good picture!  I think she needs a name.  Something with cousins...


Wednesday, March 7, 2012

Ruby!

I finished a quilt last weekend!  The herringbone blocks are made from a tutorial I found at www.bijoulovelydesigns.com.  I fell quite in love with the blocks and decided to use them with my "Ruby" by Bonnie and Camille for Moda fabric collection.  I bought this collection when it first came out and have been petting it for quite some time.  Yesterday was finally pretty enough  to take Miss Ruby out for some photos so here they are!  

 My quilt helper wasn't tall enough!  


Still not tall enough but so willing to help!  "Hey, Mom, I have an idea!  Why don't you hold the quilt and let me take the picture?"   
Much better!  Photo credits to Tucker Skaggs.  Gracias!